The Engraving Room, 1983-85 (Odhams-Sun Printers)
by Dave Walker
Dave moved to Sun Printers as a process engraver in 1983 after Odhams was merged with Sun, and left near the end of 1985 during a voluntary redundancy ‘exercise.’ His redundancy package included a free six-week retraining course at Watford College, so he retrained into small offset printing. He is now print room manager at the College of North East London.
When I started in the Engraving department at Sun Printers in 1983, there were about 30 engravers/colour revisionists, 4 supervisors (called ‘bumblies,’ for some reason; something to do with a 1950s Michael Bentine TV show, I think), and 2 managers – one on the day shift and one on nights. There were 3 shifts: days, evenings, and nights. The day shift went from 8 a.m. to 4:30 p.m., evenings from 4 p.m. to 10:30 p.m., and nights from 10 p.m. to 7:30 a.m. (Monday to Thursday). By 1985, when I left, the number of engravers was down to about 20 and more were to leave during the following year as the demand for gravure printing dropped.
The main role of the Engraving department was to carry out colour corrections on the cylinders, hand-engrave blemishes and marks to remove them, and repair knocks, band marks (sometimes made by the doctor blade), and scratches. The methods at the Sun were slightly different from those at Odhams; they were not yet using the Helioklischograph to cut the cells but were still relying on traditional etching, which made colour correction and engraving more critical.
No one specialized in any one area in this department, but some people were more skilled in some things than others. I particularly liked the engraving side of it as that was my background.

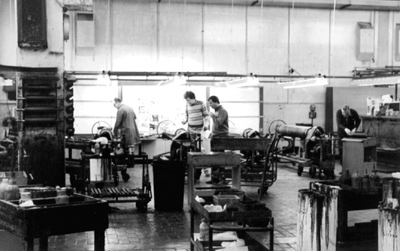
A general view of the Sun’s engraving room, 1984.

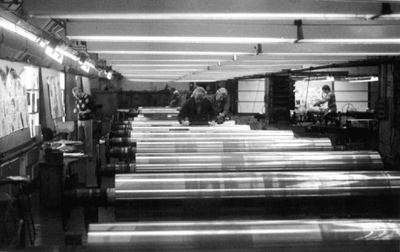
The night shift starts, with cylinders proofed and waiting for colour correction.
Nobody worked exclusively on one title. At the start of the shift you could choose which job you preferred to work on. Of course, this meant that if you were a bit late you could get stuck with a particularly nasty one that no one else wanted. Generally, the red cylinder was the most important, as over-etching would make the pictures too ‘warm.’ The key or black was the least important, so if you felt particularly enthusiastic or ‘arty’ you might choose to work on the red or blue, if not, the key or yellow (if they’d not all been taken).
A whole shift could be spent working on one cylinder, or you might get two or three done in a shift, depending on the amount or complexity of the work required.
When shifts changed there was an overlap of about 30 minutes, which gave time to liaise with the next shift so that the engraver could explain unfinished jobs to the colleague taking over.
Only occasionally were there panic jobs, when you might be asked to work into the evening shift if on days or into the morning if on nights – not recommended after all that close work and with a long drive home and no sleep.
Once the four cylinders of a particular publication had been revised, they would be sent for proofing by the supervisor, depending on which stage they were at. The first proofs were sent to the publisher for his comments and corrections, and these were interpreted by the supervisor and the proof sheets marked up accordingly. The corrections were usually started 4 to 6 weeks before publication, except in the case of the time-sensitive Farmers Weekly, but that weekly was all monochrome, apart from the cover, so was easy to revise. Final corrections on chromed cylinders would be sent straight to the press, wheeled there by the Natsopas.
For colour corrections, a proof sheet was marked up showing the areas where the colour needed to be increased or reduced for the particular colour you were working on. First, the copper cylinder needed to be cleaned with ‘bear’s breath,’ a particularly nasty-smelling mixture of acid and other things, usually made by the apprentices. It cleaned any grease or traces of ink from the cylinder, which was then washed with meths to neutralize the acid and dry the surface. The areas marked for colour correction were then rolled up with ink – not printing ink but acid-resistant ink, which would protect the surface of the cylinder but leave the cells clear and ready for etching. The areas to be etched were then carefully painted round with cold bitumen (usually diluted with turps or meths to make it thinner and easier to apply), which further protected the surrounding areas of the cylinder.
Etching the cells increased their depth, enabling them to hold more ink during the printing process. The etching was done using a swab of cotton wool soaked in ‘iron’ (ferric chloride) for a length of time determined by the experience of the engraver – seldom longer than one minute. Care had to be taken not to break down the cell walls or else the ink would ‘spew’ when printed. Particular care had to be taken when etching faces or flesh, especially on the red. For a front cover, for instance, the eyes would be painted out, the face might be airbrushed with bitumen round the edges so as not to create a hard edge, and the etch would be kept to a minimum.
Once the cylinder had been chromed after colour correction, further corrections could be made to reduce the colour, if necessary. This was done with ‘wipes,’ a thick green resinous substance made by the Sun’s chemists, I think. A small blade was loaded with it and drawn across the area with pressure applied, so as to partially fill the cells and reduce their depth. The area was then painted out to protect it, and the surrounding areas were freed with a swab of acetone. For even more reduction, this could be done twice.
On damaged cylinders or to completely remove something, copper could be deposited into the cells electrolytically, that is, by ‘growing’ copper into the cells using a type of large battery charger and a copper sulphate solution applied with a curved copper square covered with felt. The copper on the surface of the chromed cylinder was then rubbed away with a block of charcoal and water, leaving the cells filled with copper. This technique could also be used to remove band marks from chromed cylinders but this was a lengthy process.
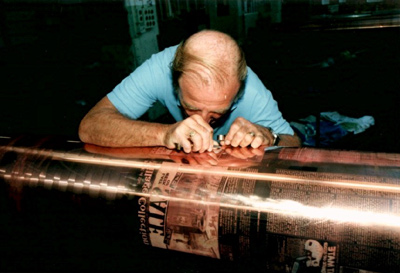
Missing type would be engraved in, using a graver and glass and cutting in the cells to form the letters. In the same way, cells could be cut to remove blobs and blemishes. Particular care needed to be taken to ensure that the cells were cut to the right depth. This ability was only achieved by experience.

Ken Cockcroft uses a magnifying glass and a graver to remove a blemish from an etched cylinder. (Photo supplied by Ray Cox)
Occasionally an ‘Autotron’ mark was missing from a cylinder – that is, the small bar that the ‘magic eye’ on the press scanned to keep the colours in register. It had to be cut in by hand, and accuracy was critical. A piece of transparent film was laid over the proof and the position marked by pin holes; the film was then transferred to the cylinder and the cells cut in.
The cylinders to be worked on were attached to motors so that they could be spun for cleaning and rolling up. The marked-up proof was hung up along with the originals (usually transparencies) on a light box.
Very occasionally, a cylinder would be damaged in a non-printing area while on the press, so to save ‘down’ time, an engraver would be called to go out into the press and work on the cylinder in situ. The task involved carefully filing the dent flat and finishing with emery paper, then filling with filler. Working out on the press was particularly hazardous and was frowned upon by the union, although it could save thousands of pounds in ‘down’ time if the cylinder didn’t have to be taken off the press and brought to the engravers. You would be working in an unfamiliar environment in the middle of the press, surrounded by sharp bits of machinery, with your face inches away from a cylinder that had just been washed down with highly flammable solvent and was giving off strong fumes. The machine was not shut down during this operation, but just stopped. The wrong press of a button by someone would have had disastrous results. This option was only called upon in extreme circumstances and I’m not sure it would be allowed nowadays, for health and safety reasons.

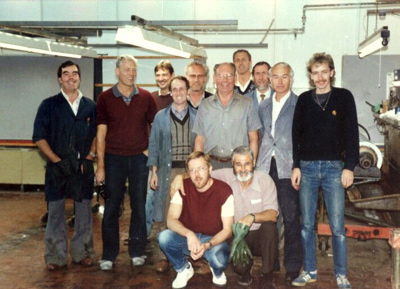
The Engraving Room night shift, September 1985. Standing, from left: Mick Newman, [?], Robin Bush, David Ranger, Pete ?, Tim Clapham, [?], Ian Spivey, Tony Chambers, Russell Haines; in front: Terry Thornton, Mick Talbot.
Unless otherwise stated, the photos in the article are courtesy of Dave Walker (a photo of Dave can be found in the People file).